Originally published on FAIRTIQ Tech Blog
At some point, when a startup outgrows its first office (which also happens to be the apartment of one of the founders), it becomes challenging to continue training Machine Learning (ML) models on your laptop, because:
- Training becomes slow as the dataset grows. Also, you cannot close the laptop while training.
- As ML team grows, people need a shared view on model’s performance.
What’s the next step? Typically it’s a cloud-based platform. The largest players here are AWS Sagemaker, Azure ML and Google AI Platform. Those systems are being very actively developed, driven by the high demand. As a result, they have exploded in the number of features and configurations for various use cases. The amount of features grows faster than the documentation that is constantly getting outdated. On top of that, the documentation is often fragmented. You have to check multiple tutorials,all of which use slightly (or not) different examples. Lastly, tutorials typically walk you through a complete, but toy example (usually with CIFAR data) that is not relevant for a real-life system.
Below, I’ve put together a reference guide for setting up an ML training pipeline with AWS Sagemaker. It is especially useful when you want to migrate an existing local ML pipeline.
I chose Sagemaker for a couple of reasons:
- We already use other AWS services such as S3 and IAM. This way we use a familiar platform and simplify legal aspects for data storage and processing.
- Sagemaker allows to setup an ML training pipeline with few changes to the existing code.
This guide covers the following topics:
- Running Sagemaker training jobs with Tensorflow in Docker images. Loading training data from S3.
- Dependency management. Real-life software usually has dependencies on external libraries. This aspect is largely overlooked in tutorials from vendors.
- Circle-CI integration configuration.
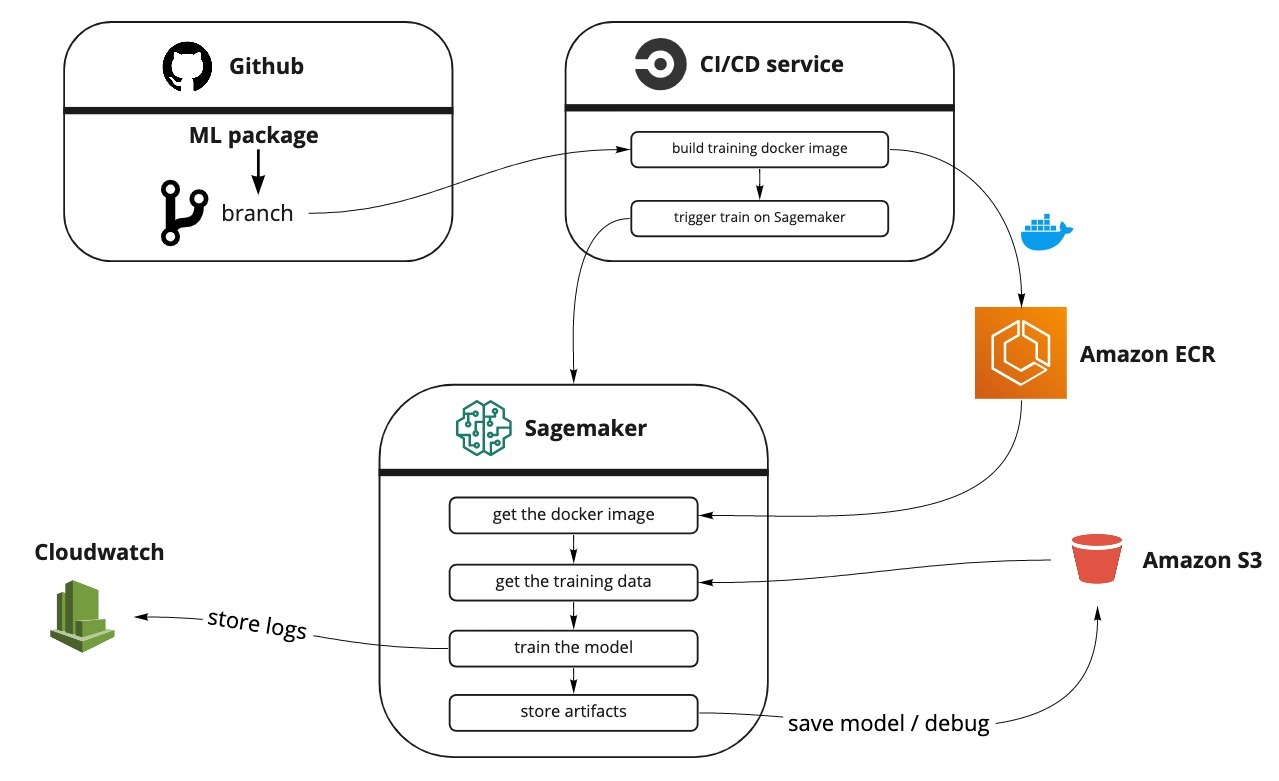
Below you can see the overall pipeline architecture that we are going to implement:
What’s not (yet) covered:
- Monitoring and debugging. I will cover this in my next post.
- Hyperparameter tuning / Sagemaker experiments. Here is a video that to learn more about these topics: https://www.youtube.com/watch?v=Tnv6HsT1r4I
- Distributed training
- Model serving from AWS
- Managing training data through Sagemaker
Prerequisites
- Python 3. AWS Sagemaker starting v1.56.2 supports python 3.7.
- Tensorflow ≥ 2.1.
- Python dependencies are pip-installable (either from pypi or github repositories).
- Training/validation/… datasets are stored on S3.
AWS Resources
When creating S3 buckets, make sure they are all created in the same AWS region, and use the same region when submitting Sagemaker jobs.
Locally you can configure the AWS default region with aws configure command.
Packaging your training pipeline
Sagemaker offers two ways to spawn training jobs: using a pre-built image or shipping your own Docker image. We are going for the latter for the following reasons:
- Not being dependent on the supported library versions for pre-built images. Pre-built Sagemaker images typically lag behind the latest library versions. With Docker you can ship any version you want, for example Tensorflow latest dev build.
- Building a custom Docker image allows to include both public and private dependencies in an easy way.
This guide assumes the following directory structure of your ML project1:
MY_ML_PROJECT/
  MY_ML_PACKAGE/
    __init__.py
    ...
    train.py
  sagemaker/
    prepare.sh
    build_and_push_image.sh
    Dockerfile
    entrypoint_train.py
    run_sagemaker.py
    requirements.txt
  ....
Below is the description of the purpose of each file that we’ll need:
prepare.sh: shell script to prepare the build environment – download private dependencies.build_and_push_image.sh: shell script to build a docker image and store it on AWS. Can be called locally or from a CI service. Not needed if you use Circle-CI (see Building an image from Circle-CI below).Dockerfile: standard file for Docker that defines how to assemble an image and run our code.entrypoint_train.py: This is the entry script that is called by Sagemaker in the Docker container. It reads arguments passed to Sagemaker and handles any errors.train.py: python script that loads the data and trains the model. Called byentrypoint_train.py.run_sagemaker.py: Python script to start the training on AWS Sagemaker. Can be called locally or from a CI service.requirements.txt: requirements file for packages needed specifically for training.
Let’s now look at the files and their purpose in detail. The repository with all the files from this guide is also available at: https://github.com/fairtiq/sagemaker-templates/tree/master/sagemaker-docker-basic.
Building a docker image
First, prepare.sh script prepares the environment – makes sure our entry point is executable and downloads private dependencies:
#!/usr/bin/env bash

# Fail on errors
set -o errexit

__dir="$(cd "$(dirname "${BASH_SOURCE[0]}")" && pwd)"

chmod +x ${__dir}/entrypoint_train.py

rm -rf tmp
# PRIVATE DEPENDENCIES
echo "Cloning PRIVATE-REPO..."
git clone [email protected]:COMPANY/PRIVATE-REPO.git tmp/PRIVATE-REPO
Next is the script build_and_push_image.sh to build a docker image and push it to AWS. You need to customize/setup the following variables:
REPO_NAME- the name of the repository to create/add on ECR (Elastic Container Registry). It’s an AWS service that stores your docker images.- Replace
[email protected]:COMPANY/PRIVATE-REPO.gitwith the address of the repository containing your private dependency. Add more if needed. - Make sure to run
aws configureto setup the AWS region you are working from. The region has to match the S3 bucket region when your training/validation data is stored.
Change the image tag if needed. The script uses latest tag (line 18).
#!/usr/bin/env bash

# Fail on errors
set -o errexit

# call prepare.sh in the same directory
__dir="$(cd "$(dirname "${BASH_SOURCE[0]}")" && pwd)"
sh ${__dir}/prepare.sh

# The name of the image in the AWS registry
repo_name=REPO_NAME

account=$(aws sts get-caller-identity --query Account --output text)

# Get the region defined in the current configuration
region=$(aws configure get region)

fullname="${account}.dkr.ecr.${region}.amazonaws.com/${repo_name}:latest"

# If the repository doesn't exist in ECR, create it.

aws ecr describe-repositories --repository-names "${repo_name}" > /dev/null 2>&1

if [ $? -ne 0 ]
then
    aws ecr create-repository --repository-name "${repo_name}" > /dev/null
fi

# Get the login command from ECR and login
aws ecr get-login-password --region ${region} | docker login --username AWS --password-stdin ${account}.dkr.ecr.${region}.amazonaws.com

# Build the docker image locally with the image name and then push it to ECR
# with the full name.

docker build  -t ${repo_name} -f ${__dir}/Dockerfile .
docker tag ${repo_name} ${fullname}

docker push ${fullname}
Whenever you push an image to the ECR with the same tag, the previous image will become untagged, but remain in the repository. If you want to clean untagged images automatically, you can set up a lifecycle policy as described here: https://aws.amazon.com/blogs/compute/clean-up-your-container-images-with-amazon-ecr-lifecycle-policies/
Building an image on Circle-CI
Circle-CI is a Continuous Integration cloud service.
As we use it at FAIRTIQ, I have created a job to build and push image to ECR with it.
Circle-CI provides a convenient aws-ecr orb
that already has the build-and-push-image command that we need.
orbs:
  aws-ecr: circleci/[email protected]
...

sagemaker_build:
  docker:
    - image: circleci/python:3.7
  steps:
    - setup_remote_docker:
        docker_layer_caching: true
    - add_ssh_keys # SSH keys for git clone your dependencies
    - checkout
    - run:
        name: Prepare setup
        command: ./sagemaker/prepare.sh
    - aws-ecr/build-and-push-image:
        account-url: AWS_ECR_ACCOUNT_URL
        aws-access-key-id: AWS_ACCESS_KEY_ID
        aws-secret-access-key: AWS_SECRET_ACCESS_KEY
        create-repo: true
        dockerfile: ./sagemaker/Dockerfile
        path: .
        region: AWS_REGION
        repo: REPO_NAME
        tag: $CIRCLE_BRANCH
The config reads the branch name you are working on via the $CIRCLE_BRANCH variable and uses it as an image tag,
so that you can have separate images for each branch/pull request.
Make sure to provide the following context variables to the job: AWS_ECR_ACCOUNT_URL, AWS_ACCESS_KEY_ID,
AWS_SECRET_ACCESS_KEY and AWS_REGION. Then replace the REPO_NAME and MY_ML_PACKAGE placeholders with your values.
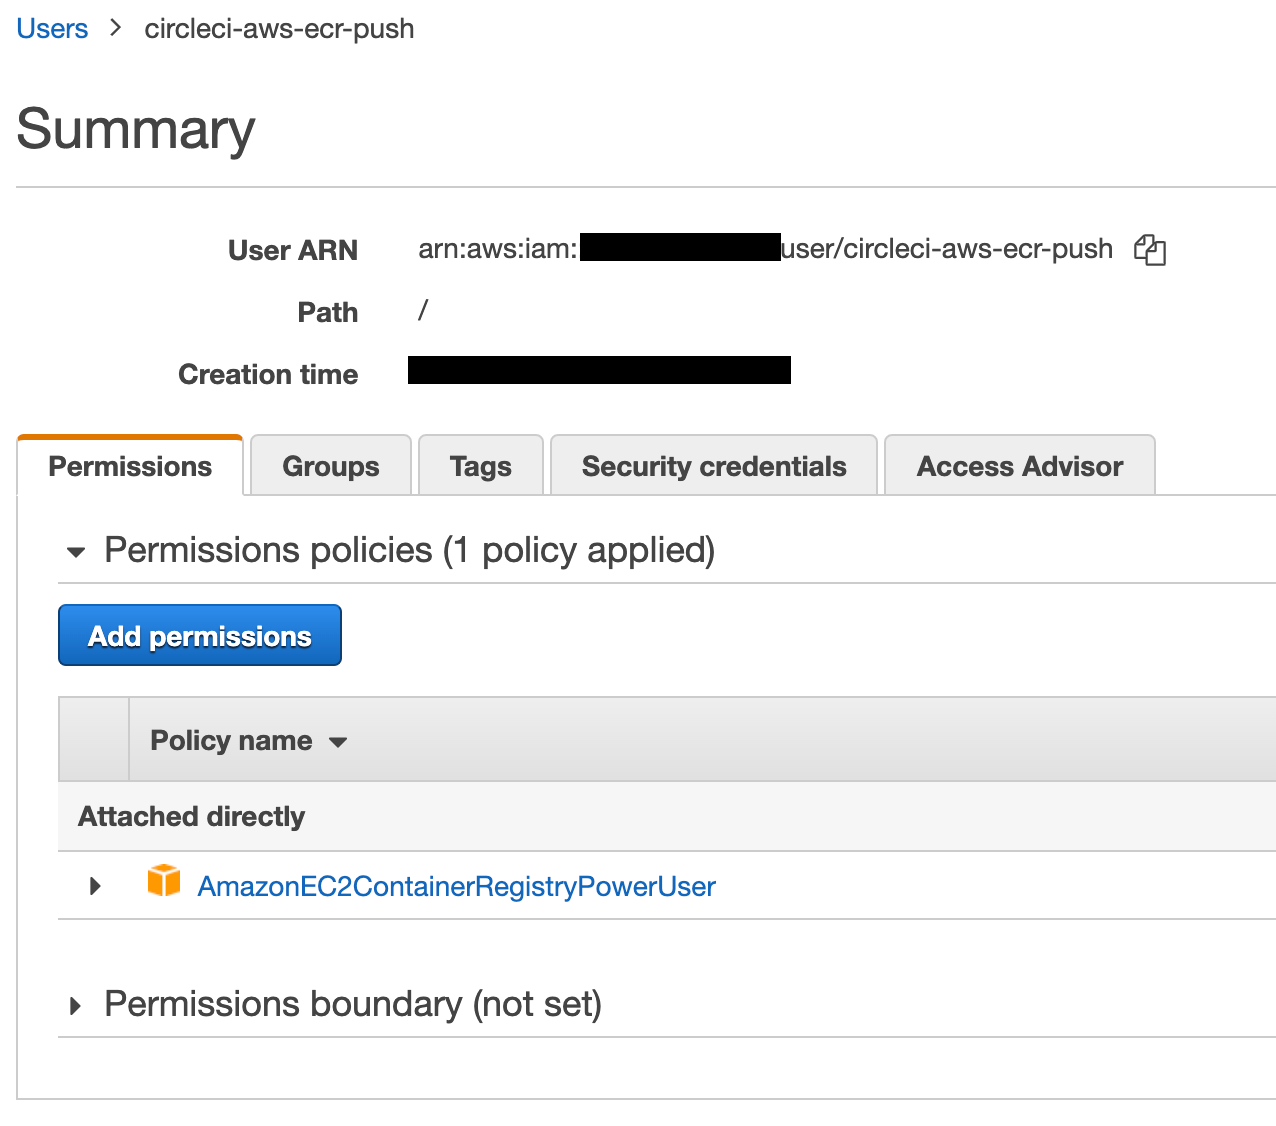
The AWS_ACCESS_KEY_ID should belong to a user with permissions to push images to ECR.
I have created a user circleci-aws-ecr-push and attached an existing policy called AmazonEC2ContainerRegistryPowerUser:
Dockerfile
Both build_and_push_image.sh and Circle-CI job call the docker build command with a Dockerfile as an argument.
Dockerfile describes how to build the container and what to package in it.
Below is the file I am using for our ML system with the comments explaining the purpose of operations:
FROM tensorflow/tensorflow:2.2.0-gpu

RUN pip install sagemaker-containers

RUN apt-get update && apt-get install -y MY_EXTRA_LIBS

# /opt/ml and all subdirectories are used by SageMaker,
# we use the /opt/ml/code subdirectory to store our ML package code.

# copy the private dependencies that we downloaded with git clone to the container
COPY ./tmp/my-private-package /tmp/my-private-package
# I keep a separate sagemaker sub-package to separate the requirements file
COPY ./sagemaker/requirements.txt /tmp/requirements.txt

# install private and public dependencies
RUN pip install /tmp/my-private-package -r /tmp/requirements.txt

#` -- /opt/ml/code
#    `-- your-ml-package
#    |-- entrypoint_train.py

COPY ./MY_ML_PACKAGE /opt/ml/code/your-ml-package
# copy the entrypoint file to the code directory
COPY ./sagemaker/entrypoint_train.py /opt/ml/code/entrypoint_train.py
WORKDIR /opt/ml/code

# add working directory to PYTHONPATH to make imports from your ML package
ENV PYTHONPATH="/opt/ml/code:${PYTHONPATH}"

# argument to sagemaker what we want to run
ENV SAGEMAKER_PROGRAM entrypoint_train.py
The process here is very straightforward. We first install the necessary system libs with apt-get,
copy and install private and public python dependencies, copy your ML package
into /opt/ml/code (but it can be anything really), and set the special SAGEMAKER_PROGRAM variable for Sagemaker to specify the entrypoint file.
⚠ Tensorflow images on DockerHub use Python 3.6, so if you need 3.7 – you’ll need to build an image from another base.
Entrypoint
We have a separate entrypoint_train.py file that calls train.py so that the latter can be also easily called locally.
The purpose of the entrypoint file is two-fold:
- Load hyperparameters from the json file: with Docker, Sagemaker stores hyperparameters in a json file at a specific path in the file system.
- Handle errors during the execution and store them for analysis.
You can basically use the file as is, only need to replace the name of your ml package on line 8.
#!/usr/bin/env python

import os
import json
import sys
import traceback

from MY_ML_PACKAGE.train import train_model, parse_args

# These are the paths to where SageMaker mounts interesting things in your container.
prefix = "/opt/ml/"
output_path = os.path.join(prefix, "output")
param_path = os.path.join(prefix, "input/config/hyperparameters.json")


def _hyperparameters_to_cmd_args(hyperparameters):
    """
    Converts our hyperparameters, in json format, into key-value pair suitable for passing to our training
    algorithm.
    """
    cmd_args_list = []

    for key, value in hyperparameters.items():
        cmd_args_list.append("--{}".format(key))
        cmd_args_list.append(value)

    return cmd_args_list


if __name__ == "__main__":
    try:
        # Amazon SageMaker makes our specified hyperparameters available within the
        # /opt/ml/input/config/hyperparameters.json.
        # https://docs.aws.amazon.com/sagemaker/latest/dg/your-algorithms-training-algo.html#your-algorithms-training-algo-running-container
        with open(param_path, "r") as tc:
            training_params = json.load(tc)

        cmd_args = _hyperparameters_to_cmd_args(training_params)

        train_model(parse_args(cmd_args)[0])
        print("Training complete.")

        # A zero exit code causes the job to be marked a Succeeded.
        sys.exit(0)
    except Exception as e:
        # Write out an error file. This will be returned as the failureReason in the
        # DescribeTrainingJob result.
        trc = traceback.format_exc()
        with open(os.path.join(output_path, "failure"), "w") as s:
            s.write("Exception during training: " + str(e) + "\n" + trc)
        # Printing this causes the exception to be in the training job logs, as well.
        print("Exception during training: " + str(e) + "\n" + trc, file=sys.stderr)
        # A non-zero exit code causes the training job to be marked as Failed.
        sys.exit(255)
Train.py
As you saw from the entrypoint file, train.py should provide the train_model() function that accepts model,
data directories, and hyperparameters as arguments. Below is an example of such file:
#!/usr/bin/env python

import argparse
import os
import tensorflow as tf


def parse_args(args=None):

    parser = argparse.ArgumentParser()

    # hyperparameters sent by the client are passed as command-line arguments to the script
    parser.add_argument("--epochs", type=int, default=1)
    parser.add_argument("--batch_size", type=int, default=25)
    parser.add_argument("--dropout_rate", type=float, default=0.5)

    # data directories
    parser.add_argument("--train", type=str, default=os.environ.get("SM_CHANNEL_TRAIN"))
    parser.add_argument("--test", type=str, default=os.environ.get("SM_CHANNEL_TEST"))

    # where to store model for export: SM_MODEL_DIR is always set by Sagemaker to /opt/ml/model
    parser.add_argument("--model_dir", type=str, default=os.environ.get("SM_MODEL_DIR"))

    return parser.parse_known_args(args=args)


def load_data(*args):
    raise NotImplementedError()


def get_model(filename):
    raise NotImplementedError()


def get_train_data(train_dir):
    return load_data(train_dir + "/training.ndjson")


def get_test_data(test_dir):
    return load_data(test_dir + "/validation.ndjson")


def train_model(args):
    model = get_model(args.dropout_rate, ...)

    train = get_train_data(args.train)
    val = get_test_data(args.test)

    model.fit(
        x=train,
        epochs=args.epochs,
        validation_data=val,
        callbacks=model.callbacks,
        verbose=2,  # print one log line per epoch -- important for parsing by sagemaker
    )

    tf.keras.models.save_model(model, args.model_dir)


if __name__ == "__main__":
    args, _ = parse_args()

    train_model(args)
This file can be both run locally by providing the necessary arguments,
and inside Sagemaker by reading some arguments from the environment variables.
That’s why we separated it from the Sagemaker-specific entrypoint file.
The SM_CHANNEL_XXXX variables specify the location of the datasets that you need during training.
These variables are set by Sagemaker when you submit a training job.
See this document for more details on the environment variables in Sagemaker: https://sagemaker.readthedocs.io/en/stable/using_tf.html
With all the files ready, you can go ahead and build and push image by running:
sh ./MY_ML_PACKAGE/sagemaker/build_and_push_image.sh
You need to run this script each time you modify your ML package (including dependencies), so I would really advise to setup an automated job on a CI service of your choice.
Launching training on Sagemaker
In the next sections we look how to finally start Sagemaker training jobs with the Docker image we built.
Setting up Sagemaker execution role in AWS IAM
The starting point is to create the necessary role to run training jobs on Sagemaker.
The easiest way is to create it as a by-product of the notebook instance2: in AWS Console, go to Sagemaker → Notebook Instances, and click on “Create notebook instance”. Go down to the “Permissions and Encryption” section, and select “Create new role”, then follow the workflow. AWS will create a role named “AmazonSageMaker-ExecutionRole-YYYYMMDDT…”. You can cancel the notebook instance creation after the role is created.
Python script to submit a job
To submit a job to AWS Sagemaker, we create an Estimator object and call the fit() method on it:
import os
from sagemaker.estimator import Estimator
import sagemaker

# TODO: change me
BUCKET_NAME = "MY_BUCKET"
REPO_NAME = "REPO_NAME"


sess = sagemaker.Session(default_bucket=BUCKET_NAME)
role = os.environ["SAGEMAKER_ROLE"]
tag = "latest"
account_url = os.environ["AWS_ECR_ACCOUNT_URL"]

tf_estimator = Estimator(
    role=role,
    train_instance_count=1,
    train_instance_type="ml.m5.large",
    sagemaker_session=sess,
    output_path=f"s3://{BUCKET_NAME}/sagemaker/model",
    image_name=f"{account_url}/{REPO_NAME}:{tag}",
    hyperparameters={"epochs": 200, "batch_size": 25, "dropout_rate": 0.5}
)

# creates ENV variables based on keys -- SM_CHANNEL_XXX
tf_estimator.fit(
    inputs={
        "train": f"s3://{BUCKET_NAME}/sagemaker/train",
        "test": f"s3://{BUCKET_NAME}/sagemaker/validation",
    }
)
This is the run_sagemaker.py script. Let’s break it down:
- To import Sagemaker lib, you need to
pip install sagemakerfirst. SAGEMAKER_ROLEis the role we created in the previous step.AWS_ECR_ACCOUNT_URL- url of form{company_id}.dkr.ecr.{region}.amazonaws.com. You can see it on your Amazon ECR repositories page.train_instance_type– the Sagemaker instance type you want to do the training on3. Full list: https://aws.amazon.com/sagemaker/pricing/instance-types/.output_path- Where Sagemaker will store training artifacts (such as model file and debug output).hyperparameters– any parameters that you’d like to pass to your training job. They will be stored in a json file and copied to the docker image as discussed before.- inputs argument in
fit(): each key specifies a dataset directory that the training job needs. These will be set asSM_CHANNEL_XXXvariables described earlier. The values have to be directories, not files, otherwise Sagemaker will throw an exception. Read more here: https://sagemaker.readthedocs.io/en/stable/using_tf.html#call-the-fit-method.
Setting up a role to launch training jobs
The Sagemaker execution role we defined above is assumed by Sagemaker after starting the training job:
it is used to download the docker image, access and store data on S3, etc4.
But to call the run_sagemaker.py script we also need a user with another set of permissions.
Here is the the basic policy that needs to be attached to the user running the script:
{
    "Version": "2012-10-17",
    "Statement": [
        {
            "Sid": "VisualEditor0",
            "Effect": "Allow",
            "Action": [
                "iam:GetRole",
                "iam:PassRole"
            ],
            "Resource": "arn:aws:iam::ACCOUNT_ID/service-role/AmazonSageMaker-ExecutionRole-XXX"
        },
        {
            "Sid": "VisualEditor1",
            "Effect": "Allow",
            "Action": "sagemaker:CreateTrainingJob",
            "Resource": "*"
        }
    ]
}
Launching training from Circle-CI
As before, our goal is to automate the tasks as much as possible, so we also want to run the training script from a CI service.
The run_sagemaker.py script needs a couple adjustments:
...
tag = os.environ.get("CIRCLE_BRANCH") or "latest"
...
tf_estimator.fit(
    ...
    wait=False # exit without waiting
)
And here is our Circle CI job definition:
orbs:
  aws-cli: circleci/[email protected]
....

sagemaker_training:
  docker:
    - image: circleci/python:3.7
  steps:
    - setup_remote_docker:
        docker_layer_caching: true
    - checkout
    - aws-cli/setup:
        aws-region: AWS_REGION
    - run: pip install sagemaker
    - run:
        name: Run training script
        command: python ./sagemaker/run_sagemaker.py
Putting it all together
Running the run_sagemaker.py script will create a training job with the name REPO_NAME-YYYY-MM-DD-HH-mm-ss-SSS,
You should be able to see the status and the meta information about the job under the Training/Training jobs link in AWS Sagemaker console.
The output should look like the following:
Starting - Starting the training job...
Starting - Launching requested ML instances.........
Starting - Preparing the instances for training...
Downloading - Downloading input data
Training - Downloading the training image.........
Training - Training image download completed.
Training in progress.
sagemaker-containers INFO     Invoking user script
...
Invoking script with the following command:

/usr/local/bin/python entrypoint_train.py --batch_size 25 --dropout_rate 0.3 --epochs 10
...
...
sagemaker-containers INFO     Reporting training SUCCESS

Uploading - Uploading generated training model
Completed - Training job completed
When running in detached mode (via CI), you can see the same logs in AWS CloudWatch under /aws/sagemaker/TrainingJobs log group.
After the job is completed, the model will be stored on S3 at s3://MY_BUCKET/sagemaker/model/JOB_NAME/output/model.tar.gz
The setup is quite involved, and I may have forgotten something along the way, so let me know in the comments if something doesn’t work for you.
Notes
-
I was using this guide from Amazon as a starting point: https://github.com/awslabs/amazon-sagemaker-examples/blob/master/advanced_functionality/tensorflow_bring_your_own/tensorflow_bring_your_own.ipynb. It also describes how to set up the inference, which we don’t cover here. ↩
-
I have also tried to create the role myself with SageMakerFullAccess and S3FullAccess permissions, but this role didn’t work later when starting training jobs. I didn’t find any differences in permissions between my role and the one created through a workflow. ↩
-
To run this script in local mode, use
train_instance_type="local"and removesagemaker_sessionargument. This will emulate the whole Sagemaker pipeline, but will run the Docker image on your local machine instead. ↩ -
Read more here: https://botocore.amazonaws.com/v1/documentation/api/latest/reference/services/sagemaker.html#SageMaker.Client.create_training_job. Search to the
RoleArnargument. ↩